Overview
Speech services is one of the main categories of Azure Cognitive Services. Using this service, developers can utilize one of the four API’s to perform the following:
- Speech-to-Text
- Text-to-Speech
- Text Translation
- Speaker Recognition
In a previous post, I wrote a tutorial on converting Speech-to-Text. For this post, I will go in the opposite direction and provide step-by-step directions to covert text-to-speech.
How to Use Text-to-Speech
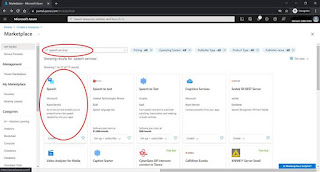
- First, we need to setup the Speech resource in Azure. Simply specify “speech services” in the search bar, and all speech resources in Azure marketplace will be displayed. For this project, we will use Microsoft’s Speech Azure Service.
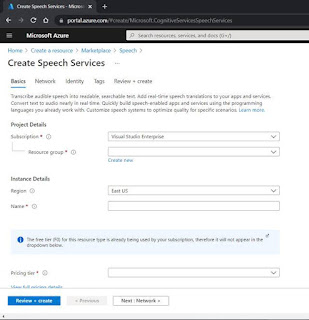
- After clicking create and providing the fundamental parameters for the setup, subscription keys will be provided.
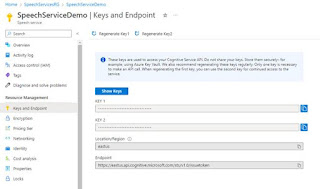
- Obtain the subscription key for the above resource
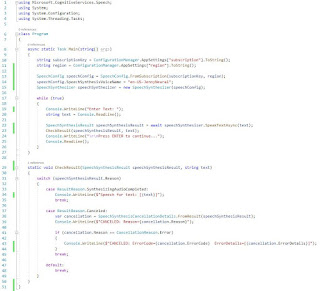
- Setup a console project in Visual Studio, and add the “Microsoft.CognitiveServices.Speech” NuGet package. Listed below is the complete code file.
The class “Program” contains 2 methods: Main() & CheckResult().
Breaking Down Main()
Looking at Main(), the first task is to obtain the Subscription key and region. These 2 values are obtained from Step 3 above, and are tied to the Azure subscription. They can be used by anyone who obtains them. For this reason, these items are stored in .Config file and not made available to the reader.
The next task is to instantiate SpeechConfig class using the subscription and region. The purpose of this class to contain all configuration for the Speech Service.
In addition to subscription and region, line 14 specifies the voice to be used for the speech synthesis. Azure Speech Service offers a variety of voices and supported languages, and can be found here.
After the speechConfig class is configured, it’s passed to the constructor of the SpeechSynthesizer class. As the name suggests, this class contains methods for synthesizing, or converting, text to speech. It utilizes all configuration settings specified in the prior steps.
In lines 17-26, an infinite while loop cycles through asking the user for text input, asynchronously calling the SpeakTextAsync() in the speechSynthesizer class.
speechSynthesizer.SpeakTextAsync() is an async method that takes the text string as an input parameter, sends it to Azure Speech Services to be synthesized as the desired spoken language, then plays the synthesized speech on the default speaker.
Breaking Down CheckResult()
This method is used for error checking the synthesis results and handling it accordingly. CheckResult() examines the results returned in the Reason property of the speechSynthesisResult instance. If synthesis completed successfully, it simply echoes the text entered. Otherwise if an error occurred, it will display the messages stored in the ErrorCode and ErrorDetails properties of the SpeechSynthesisCancellationDetails class.
A complete demo of Text-to-Speech service can be found in this segment.
Why use Text-to-Speech
The first reaction most developers have once they hear the results is “how cool is this?”. It’s certainly cool, but the benefits of this feature extend beyond a novelty. Applications can now verbally communicate results with visually impaired users, a segment of the user population that is often overlooked. Another benefit of verbal communication is allowing all users to hear results while doing other tasks instead of having to focus on a screen to read results. Text-to-Speech is 1 of 4 services in the Speech category of Cognitive Services.
A video presentation and demo on “Overview of Speech Services” discusses all the services in more detail. The corresponding code used for the video presentation and this article can be found at https://github.com/SamNasr/AzureSpeechServices.
This post was featured as part of the C# Advent 2022, an annual blogging event hosted by Matthew D. Groves.


