Friday, January 20, 2023

7 Ways to Reduce Azure Costs

Listed below are 7 ways to reduce your Azure monthly cost.


1. Shut down unused resources

Use Azure Advisor to identify idle virtual machines (VMs), ExpressRoute circuits, and other unused resources.


2. Right-size underused resources

Find resources not fully utilized with Azure Advisor.  It will also provide recommendations on reconfiguring resources to reduce cost.


3. Reserve instances for consistent workloads

Use reservation pricing to pre-pay for resources for a 1 or 3 year term.  This could result in a discount of up to 72% over pay-as-you-go pricing on Azure services.


4.
Take advantage of the Azure Hybrid Benefit

Have existing on-premises software licenses?  Use them with Azure for no additional cost and select Azure services for free.


5. Configure autoscaling

Avoid the high cost of hardware investment used only during peak times of the year.  Instead, dynamically allocate and de-allocate resources to match your business needs when you need it.


6. Set up budgets and allocate costs to teams and projects

Use Microsoft Cost Management to create and manage budgets of Azure services used, and monitor your organization’s cloud spending.


7. Choose the right Azure compute service

Azure offers a variety of resources, with varying degrees of management.  Depending on the level of resource management you choose, the monthly spend can be reduced significantly. Use the following diagrams to identify the various resources and management needs.


Diagram Reference: https://medium.com/chenjd-xyz/azure-fundamental-iaas-paas-saas-973e0c406de7


Wednesday, December 14, 2022

Text-to-Speech Step-By-Step

Overview

Speech services is one of the main categories of Azure Cognitive Services.  Using this service, developers can utilize one of the four API’s to perform the following:

  1. Speech-to-Text
  2. Text-to-Speech
  3. Text Translation
  4. Speaker Recognition


In a previous post, I wrote a tutorial on converting Speech-to-Text.  For this post, I will go in the opposite direction and provide step-by-step directions to covert text-to-speech.


How to Use Text-to-Speech

  1. First, we need to setup the Speech resource in Azure.  Simply specify “speech services” in the search bar, and all speech resources in Azure marketplace will be displayed.  For this project, we will use Microsoft’s Speech Azure Service.
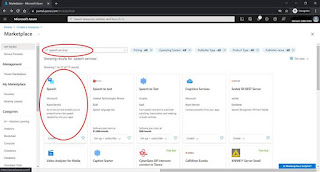


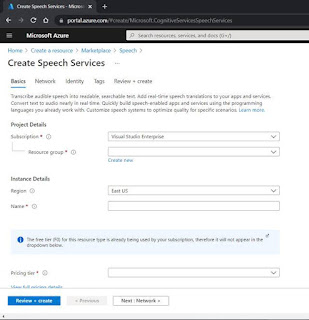
  1. After clicking create and providing the fundamental parameters for the setup, subscription keys will be provided.


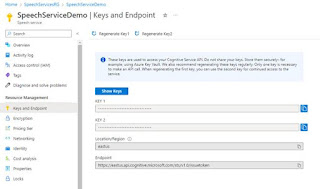
  1. Obtain the subscription key for the above resource


  1. Setup a console project in Visual Studio, and add the “Microsoft.CognitiveServices.Speech” NuGet package.  Listed below is the complete code file.
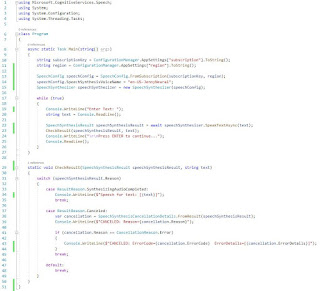


The class “Program” contains 2 methods: Main() & CheckResult(). 


Breaking Down Main()

Looking at Main(), the first task is to obtain the Subscription key and region.  These 2 values are obtained from Step 3 above, and are tied to the Azure subscription.  They can be used by anyone who obtains them.  For this reason, these items are stored in .Config file and not made available to the reader.


The next task is to instantiate SpeechConfig class using the subscription and region.  The purpose of this class to contain all configuration for the Speech Service.

In addition to subscription and region, line 14 specifies the voice to be used for the speech synthesis.  Azure Speech Service offers a variety of voices and supported languages, and can be found here.


After the speechConfig class is configured, it’s passed to the constructor of the SpeechSynthesizer class.  As the name suggests, this class contains methods for synthesizing, or converting, text to speech.  It utilizes all configuration settings specified in the prior steps.


In lines 17-26, an infinite while loop cycles through asking the user for text input, asynchronously calling the SpeakTextAsync() in the speechSynthesizer class. 

speechSynthesizer.SpeakTextAsync() is an async method that takes the text string as an input parameter, sends it to Azure Speech Services to be synthesized as the desired spoken language, then plays the synthesized speech on the default speaker.


Breaking Down CheckResult()

This method is used for error checking the synthesis results and handling it accordingly. CheckResult() examines the results returned in the Reason property of the speechSynthesisResult instance.  If synthesis completed successfully, it simply echoes the text entered.  Otherwise if an error occurred, it will display the messages stored in the ErrorCode and ErrorDetails properties of the SpeechSynthesisCancellationDetails class.


A complete demo of Text-to-Speech service can be found in this segment.


Why use Text-to-Speech

The first reaction most developers have once they hear the results is “how cool is this?”.  It’s certainly cool, but the benefits of this feature extend beyond a novelty. Applications can now verbally communicate results with visually impaired users, a segment of the user population that is often overlooked.  Another benefit of verbal communication is allowing all users to hear results while doing other tasks instead of having to focus on a screen to read results. Text-to-Speech is 1 of 4 services in the Speech category of Cognitive Services. 


A video presentation and demo on “Overview of Speech Services” discusses all the services in more detail.  The corresponding code used for the video presentation and this article can be found at https://github.com/SamNasr/AzureSpeechServices.


This post was featured as part of the C# Advent 2022, an annual blogging event hosted by Matthew D. Groves

Wednesday, December 7, 2022

VNet Questions Answered

During the last meeting of the .NET Study Group on Azure Virtual Networks, a couple questions came up that needed further explanation.  I thought it would be best to post the and share them


Question: Do I need a NSG or Subnet if a VM is in VNet? 

Answer: Yes, it’s a best practice.  By default, services outside the VNet cannot connect to services within the VNet.

However, you can configure the network to allow access to the external service.  Therefore, assume you have a VNet that contains both web servers and DB servers.  You can have VNET configured for public access to allow outside users to access the web servers.  You would also need a subnet or NSG to prevent that same public traffic from accessing the DB servers in the same VNet.


Question: Can you provide a sample diagram of the Azure Infrastructure and how VNets would be implemented?

Answer: See below for the Sample Azure Infrastructure Diagram: (https://www.dotnettricks.com/learn/azure/what-is-microsoft-azure-virtual-network-and-architecture)


Question: Where can I find a list of Frequently asked questions on Azure VNets?

Answer: For additional reading on Azure VNet, see the FAQ page at https://learn.microsoft.com/en-us/azure/virtual-network/virtual-networks-faq


Thursday, November 3, 2022

Wednesday, September 14, 2022

Thursday, March 24, 2022

Friday, January 28, 2022

Overview of Cognitive Services

Microsoft’s Azure offers a great deal of features and capabilities.  One of them is Cognitive Services, where users can access a variety of APIs to help mimic a human response.  Some features include converting text to spoken speech, speech to text, and even the equivalent human understanding of a spoken phrase.  These services are divided into 4 major categories, as seen below.  Please note “Computer Vision” and “Custom Vision” sound very similar but their capabilities are different, as outlined in the “Vision” section below.


Decision

  1. Anomaly Detector: Identify potential problems in time series data.
  2. Content Moderator: Detect potentially offensive or unwanted content.
  3. Personalizer: Create rich, personalized experiences for every user.


Language

  1. LUIS (Language Understanding Intelligent Service)
  2. QnA Maker: Create a conversational question and answer layer over your data.
  3. Text Analytics: Detect sentiment, key phrases, and named entities.
  4. Translator: Detect and translate more than 90 supported languages.


Speech

  1. Speech to Text: Transcribe audible speech into readable, searchable text.
  2. Text to Speech: Convert text to lifelike speech for more natural interfaces.
  3. Speech Translation: Integrate real-time speech translation into your apps.
  4. Speaker Recognition: Identify and verify the people speaking based on audio.


Vision

  1. Computer Vision: Analyze content in images.
    1. OCR: Optical Character Recognition
    2. Image Analysis: extracts visual features from images (objects, faces, adult content
    3. Spatial Analysis: Analyzes the presence and movement of people on a video feed and produces events that other systems can respond to.


  1. Custom Vision: Customize image recognition to fit your business needs.
    1. Image Classification: applies label(s) to an image
    2. Object Detection: returns coordinates in image where applied label(s) can be found.

Note: Model can be exported for use: https://docs.microsoft.com/en-us/azure/cognitive-services/custom-vision-service/export-your-model


  1. Face: Detect and identify people and emotions in images.
  2. Video Indexer: Analyze the visual and audio channels of a video, and index its content.
  3. Form Recognizer: Extract text, key-value pairs and tables from documents.
  4. Ink Recognizer: Recognize digital ink and handwriting, and pinpoint common shapes.


Saturday, December 4, 2021

How (and Why) You Should Use Speech-to-text

Overview

Speech-to-text is one of the many cognitive services offered by Azure.  All Azure cognitive services can be classified into one of four primary categories:

  1. Decision
  2. Language
  3. Speech
  4. Vision

Each category contains a variety of services, with Speech-to-text categorized in the “Speech” category.  It converts spoken language to text using either an SDK or web API call.  Both methods will require a subscription key, obtained by a brief resource setup in the Azure portal.  Speech-to-text can be configured to recognize a variety of languages as displayed at https://docs.microsoft.com/en-us/azure/cognitive-services/speech-service/language-support.

In addition, the source of the speech could be either live spoken words, or a recording.


How to Use Speech-to-text

Project Setup (using SDK)

  1. Setup the Speech-to-text resource in Azure.  Simply specify “speech services” in the search bar, and all speech resources in Azure marketplace will be displayed.  For this demo, we will use Microsoft’s Speech Azure Service.


  1. After clicking create and providing the fundamental parameters for the setup, subscription keys will be provided.


  1. Obtain the subscription key for the above resource


  1. Setup a project with the “Microsoft.CognitiveServices.Speech” NuGet package.


  1. Listen and convert


Why you should use Speech-to-text?

Accessibility! Most applications depend on users not being vision impaired.  However, this prevents a significant number of users from using an application due to their impaired vision.  Certainly screen readers have been available in the Windows OS for nearly 2 decades.  This allows any user to understand what is displayed on the screen.  However, an impaired user will have difficulty interacting with the user interface (i.e. submitting info, filling forms, etc.).  Thanks to Speech-to-text, users can now speak to the application and have the words dynamically translated to text in the application.  This makes the application accessible to more users, as well as ADA and WCAG compliant.


This post was featured as part of the C# Advent 2021, an annual blogging event hosted by Matthew D. Groves